Working With an Insurance Adjuster: What to Expect
What happens during a roof damage inspection, what to have ready, the questions worth asking, why being present matters, how to handle a scope that feels too low, and the difference between a company adjuster, independent adjuster, and public adjuster.
The inspection is the single most consequential meeting in the entire claims process — it's where the scope and value of your claim get determined. Going in prepared changes outcomes. This guide covers what actually happens during a roof damage inspection, what to have ready, what to ask, and how the different types of adjusters you might encounter change what to expect.
The three types of adjusters, and who they work for
Understanding who an adjuster works for changes how you should interact with them.
Company (staff) adjuster. A direct employee of your insurance carrier. Company adjusters handle claims as part of their regular job and are the most common type you'll encounter for an individual, non-catastrophe claim. They represent the insurer's interests but are also bound by state regulations governing fair claims handling.
Independent adjuster. Not a direct employee of your carrier, but contracted by the carrier — often during high-volume periods like a regional hailstorm, when the carrier's staff adjusters can't keep up with claim volume. Independent adjusters still represent the carrier's interests and are paid by the carrier (typically per claim), even though they don't work for the company full time. Quality and experience can vary more widely among independent adjusters than staff adjusters, since they're contracted from third-party adjusting firms.
Public adjuster. The one type on this list who works for you, the policyholder, rather than the insurance company. Public adjusters are licensed professionals (licensing requirements vary by state) who represent your interests in documenting damage, building the claim, and negotiating with the carrier — typically for a percentage of the claim settlement, which many states cap by law. Hiring a public adjuster makes the most sense for large, complex, or already-disputed claims, and least sense for small, straightforward ones where the fee could outweigh the benefit.
None of these are inherently "good" or "bad" — but knowing which one you're dealing with tells you whose interests are structurally aligned with whose, which is useful context for every conversation that follows.
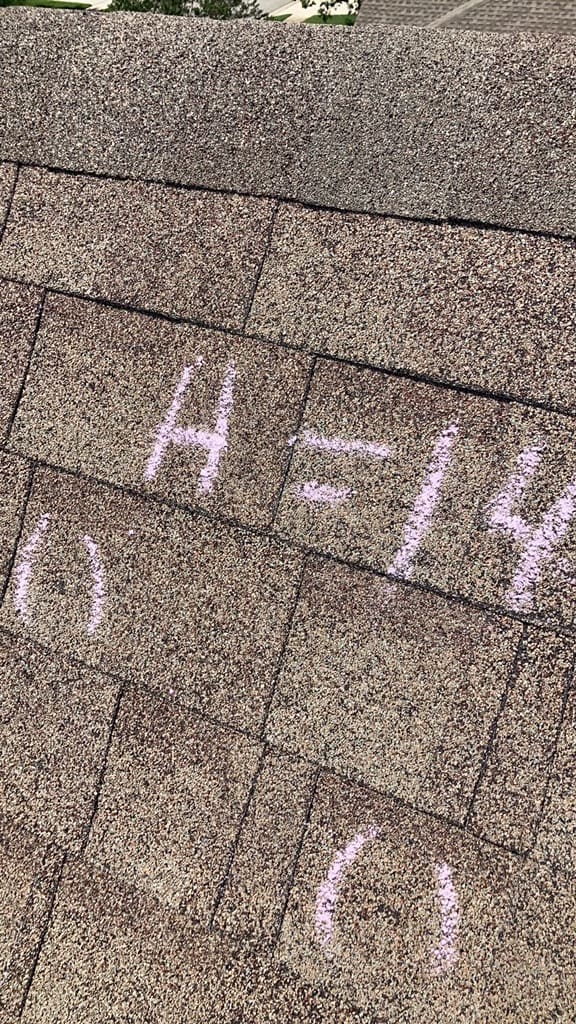
The real thing: an inspector's chalk marks on an asphalt roof. Each circle is a hail hit, and "H=14" records fourteen hits found in the test area — the count that determines whether the slope qualifies. Photo courtesy of Yellowhammer Roofing, used with permission.
What happens during the inspection
While specifics vary by carrier and adjuster, most roof inspections follow a similar structure:
- Exterior walkaround. The adjuster reviews the overall condition of the roof, siding, gutters, and any visible exterior components before getting on the roof itself.
- Roof access and slope-by-slope assessment. The adjuster gets onto the roof (weather and safety permitting — steep or wet roofs sometimes get assessed from a ladder or via drone instead) and examines each slope separately, since damage severity often varies by which direction a slope faced during the storm.
- Test squares. As covered in our guide to hail damage signs, adjusters commonly mark off sample areas on each slope and count qualifying hail hits to determine whether that slope meets the carrier's threshold for damage.
- Soft metal check. Gutters, downspouts, vents, and AC equipment get checked for corroborating dent patterns.
- Age and condition assessment. The adjuster will note the apparent age and pre-existing condition of the roofing material, since this affects both damage causation and any depreciation applied to the settlement (see our guide to understanding your policy for how depreciation works).
- Interior check, if applicable. If you've reported interior water intrusion, the adjuster may also want to see ceiling stains, active leaks, or attic conditions.
- Photos and measurements. The adjuster documents everything with photos and typically measures the roof (or uses satellite/aerial measurement tools) to calculate the materials and labor needed for the estimate.
The whole process commonly takes anywhere from 30 minutes to a couple of hours depending on roof size and complexity.
What to have ready before the adjuster arrives
- Your own documentation from before you filed — photos, notes, and the date you first noticed damage.
- Clear access to the roof, attic, and any interior areas with damage. Move vehicles, trim overhanging branches if needed, and secure pets.
- A list of specific areas you want the adjuster to look at, especially anything not obvious from a standard walkaround.
- Your claim number and any correspondence you've already had with the carrier.
- A notepad or phone to take your own notes and photos during the inspection — you're allowed to document the same things the adjuster documents.
Questions worth asking during the inspection
- Which slopes are you finding qualifying damage on, and which aren't — and why?
- Are you finding this to be primarily cosmetic or functional damage, and what's the reasoning?
- What's the process from here — when will I receive the written estimate, and how is depreciation being calculated?
- Is this an actual cash value (ACV) or replacement cost value (RCV) claim under my policy, and what do I need to do to recover any withheld depreciation?
- Is there a separate wind/hail deductible applying to this claim, and how much is it?
- What's the best way to reach you directly if I have follow-up questions or new information?
Why being present matters
An adjuster working alone can only assess what's visible and accessible to them in the time they have. Being present lets you:
- Point directly to damage you've already found, including areas that might be easy to miss from a standard walking pattern.
- Ask clarifying questions on the spot rather than after the fact, when the adjuster may not remember specifics.
- Get a real-time sense of whether the assessment feels thorough, and request they look more closely at areas you're concerned about before they leave.
- Build a working relationship and direct line of communication for the rest of the process.
If you truly can't be present, ask whether you can have someone represent you (a spouse, adult family member, or your contractor), and request detailed notes or photos from the inspection afterward.
Handling a scope that feels too low
If the adjuster's estimate seems to undervalue the damage — missing slopes, omitting code-required components, or using pricing that doesn't match current material and labor costs in your area — you have several options before escalating to a formal dispute:
- Ask directly. Request a written explanation of what was and wasn't included, and why. Sometimes gaps are oversights that get corrected with a simple follow-up call.
- Get a second opinion. A reputable roofing contractor's written assessment, especially one that documents specific discrepancies with photos, can support a request for the adjuster to take another look.
- Request a reinspection. Most carriers have a formal process for this, distinct from a full appeal.
- Escalate within the carrier if a reinspection doesn't resolve it — ask for a claims supervisor or manager.
- Consider the appraisal clause in your policy, or a formal written appeal, if the gap remains significant after the steps above. Our guide to appealing a denied or low claim covers this process in detail, including how to structure a written rebuttal.
Getting a fair scope often comes down to clear, specific, written communication more than confrontation — document everything, ask for everything in writing, and escalate calmly through the process rather than around it.
Documenting the inspection yourself
Don't rely solely on the adjuster's photos and notes to become your record of what happened. During the inspection:
- Take your own photos of the same areas the adjuster examines, ideally from a similar angle so they're directly comparable later.
- Write down, in the moment, anything the adjuster says about specific areas of damage or their overall impression — direct quotes are more useful than a paraphrased summary later.
- Note the start and end time of the inspection and roughly how long was spent on each part (exterior walkaround, roof access, interior check), since this can be relevant if you later feel the assessment was rushed.
- Ask for a copy of the adjuster's photos and notes if your carrier's process allows it, and compare them against your own once you receive the written estimate.
What happens after the inspection
Once the inspection is complete, the adjuster typically compiles a written estimate (sometimes called a scope of loss) using estimating software that breaks the job down line by line — tear-off, materials, underlayment, flashing, ventilation, labor, and any code-required components. You should receive this estimate along with an explanation of how your deductible and any depreciation were applied. This is the point to compare the estimate against your own documentation and, if you got one, a contractor's assessment. If everything lines up, you can move forward with repairs. If it doesn't, the steps in the section above — asking directly, getting a second opinion, requesting a reinspection — are the natural next moves before a more formal dispute becomes necessary.
Not sure where your claim stands?
Get matched with a vetted local roofer who documents damage the way adjusters expect to see it.
Frequently asked questions
Not always, but it's strongly recommended. Being present lets you point out specific areas of damage, ask questions in real time, and get a firsthand sense of what the adjuster is finding and why. Some inspections proceed without the homeowner present, especially during high-volume catastrophe events, but you can generally request to be there or to reschedule if you can't.
Last updated July 22, 2026